Carbon black dispersion test mistakes can lead to unreliable results that mislead decision-making and cause costly errors in production. A common frustration many manufacturers face is that dispersion testing can seem straightforward—until your results don’t match across shifts, labs, or even within the same sample. At GT-TEST, a professional supplier of testing equipment for polymer materials and plastic pipes, we understand these challenges. That's why we’ve compiled this actionable "pitfall avoidance checklist" to help laboratories and manufacturers get it right the first time and emphasize the importance of standardized processes and consistent record-keeping.
Mistake #1: Poor Specimen Slicing or Inconsistent Thickness
One of the most common sources of errors in dispersion testing is inconsistent slicing of the polymer samples. It may seem like a small step, but improper specimen preparation leads to highly variable results.
Thickness Inconsistency = Optical Artifacts
When slices of the sample vary in thickness, it causes inconsistencies in the light transmission through the material. This inconsistency distorts the appearance of carbon black particles and agglomerates during imaging. Thicker slices may show a higher contrast, while thinner slices may lack contrast, making it difficult to obtain reliable, repeatable measurements.
Why Full-Automatic Microtome Slicing Improves Repeatability
One of the most effective ways to solve this issue is by using a microtome for specimen slicing. A microtome ensures that every slice is consistent in thickness, improving the repeatability of results. With the precision offered by a microtome, the dispersion testing process becomes far more reliable, with fewer errors introduced by uneven slice thickness. The full-automatic microtome slicing system ensures that each specimen is sliced uniformly, providing more consistent and repeatable results. At GT-TEST, we offer microtome solutions tailored for polymer testing, which significantly improve the reliability of carbon black dispersion analysis.
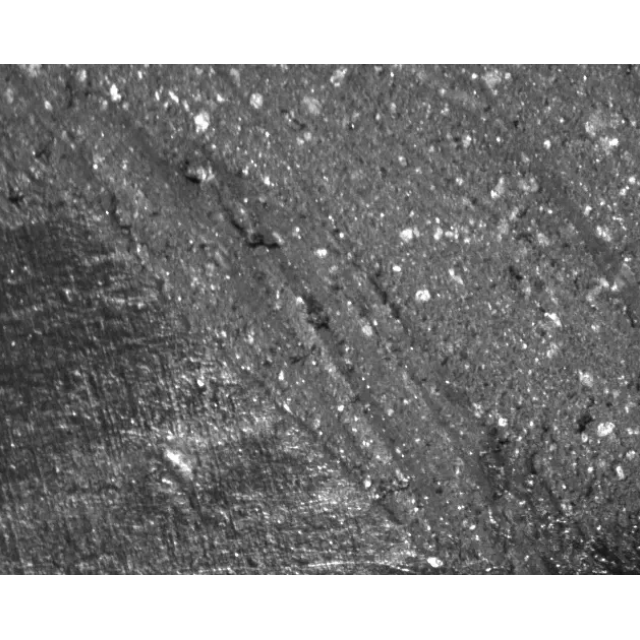
Mistake #2: Contaminated or Damaged Cut Surfaces
The quality of the cut surface plays a crucial role in the accuracy of dispersion testing. Any imperfections or contaminants on the surface can distort the test results, rendering them unreliable.
Dirt, Scratches, and Smeared Surfaces
Contaminants such as dirt or oil, scratches, and smears on the sample surface can dramatically alter the dispersion test outcome. For example, surface scratches might mimic dispersion defects or hide actual particle clusters. Even a small amount of dust can interfere with the optical clarity required for accurate analysis.
Handling Practices That Protect the Surface
To avoid these issues, it's essential to follow proper handling practices during specimen preparation. Always use gloves or tweezers when handling cut surfaces to prevent oils from fingers or other contaminants from being transferred to the sample. Ensuring that the cutting equipment and surfaces are clean before slicing the samples also reduces the chances of contamination. Additionally, using a microtome ensures that the surfaces are cut cleanly and with minimal stress, preventing damage that could alter results.
Mistake #3: Changing Magnification or Illumination Mid-Study
Once you start a dispersion test, maintaining consistency is key. Changing magnification or illumination settings during a test can introduce significant errors.
Why Oblique Light Settings Must Be Controlled
Oblique light settings play a critical role in enhancing contrast between carbon black particles and the polymer matrix. Changing the light angle or intensity can alter how particles are perceived, leading to misinterpretation of their size and distribution.
Inconsistent magnification and illumination between tests or operators can lead to results that are not comparable, even if they come from the same sample. To maintain the integrity of your results, it's important to lock magnification and illumination settings before starting the test and ensure they are not adjusted mid-study.
Calibration and Standard Sample Checks
Regular calibration of the equipment and using standard samples can also help ensure that the results are reliable. Calibration ensures that the optical system provides consistent results across different batches of testing. When working with standards, any variation from the expected result becomes more apparent, enabling quick corrective action if necessary.
Mistake #4: Too Few Fields-of-View or Biased Sampling
One of the easiest mistakes to make when conducting a carbon black dispersion test is to examine too few fields-of-view or to sample based on subjective criteria, like only looking at the “best-looking” areas of the sample.
Randomized Fields-of-View to Avoid “Best-Looking” Bias
By restricting the analysis to only the most visually appealing parts of a sample, you risk missing hidden defects or dispersion issues that could affect the material's performance. To avoid this bias, it’s essential to sample multiple random fields-of-view across the specimen. This practice ensures that the dispersion results are representative of the entire sample and not skewed by the best or worst regions.
Record-Keeping That Prevents Disputes Later
When performing multiple field-of-view checks, be sure to document the areas sampled and how they were chosen. Recording this information will prevent future disputes or questions about why certain areas were analyzed over others. Having detailed records is especially important when working with customers or auditors who may require evidence to support your results.
Mistake #5: Treating Grade as the Only Truth
The dispersion grade is a useful summary, but it should not be the only factor in your decision-making. Relying solely on the grade can lead to missed dispersion issues that affect performance.
Always Cross-Check Grade with Images and Distribution Chart
While the dispersion grade is helpful, it is not sufficient on its own to understand the full picture. Cross-check the grade with accompanying images and distribution charts to ensure that defects such as agglomerates or "windows" are detected. Often, a grade that seems acceptable may hide subtle but critical dispersion issues that could cause long-term failure.
When to Run Content Testing as a Companion Check
Another common mistake is not running carbon black content testing alongside dispersion testing. Content testing verifies whether the correct amount of carbon black is present, while dispersion testing confirms whether it is properly distributed. These tests work together to ensure both quantity and quality control. It is particularly important to run content testing when testing samples from new suppliers or production batches, as content and dispersion issues can occur independently.
Mistake #6: Not Aligning the Method with the Standard You Claim
Inconsistent methods across different laboratories or production environments can lead to significant variations in dispersion test results. If you claim compliance with certain standards (e.g., ISO 4427 or ASTM), it’s crucial to follow the precise methods outlined in those standards.
ISO/ASTM Method Alignment for Customers and Audits
For customers and audits, using the correct dispersion test method according to ISO/ASTM standards is essential. These standards provide clear, universally accepted protocols for testing. Failing to follow these guidelines can lead to disputes, delays, or issues with customer acceptance.
Document the Method in Every Report
Always document the method used in each test report. This ensures transparency and allows others to verify the test process if questions arise later. Consistent documentation is crucial for maintaining compliance with industry standards and for providing traceable, verifiable results to clients.
Mistakes → Symptoms → Fix
Mistake | What You See | Fix |
Inconsistent slicing | High variance between repeats | Standardize slicing tool & thickness |
Changing optical settings | Same sample rates differently | Lock magnification & light settings |
Biased imaging | “Always passes” until it fails | Randomize fields & save images |
Conclusion
Most bad dispersion results are actually bad workflow results. By addressing common mistakes in specimen preparation, image analysis, and result interpretation, you can ensure that your dispersion tests are more reliable and consistent. Avoiding these mistakes helps reduce errors, improve test repeatability, and ensure that your results are meaningful and actionable. Standardizing your workflow, from microtome specimen preparation to automated grading and reporting, will not only improve your results but also defend your quality control processes in audits and disputes. If you’re ready to eliminate dispersion testing headaches and improve your testing workflow, contact us to explore how our solutions, including automated reporting and microtome specimen preparation, can streamline your quality control.
FAQ
Why does slice thickness affect dispersion test results?
Slice thickness affects how carbon black particles are distributed during testing. Uneven thickness can create optical artifacts that distort the test results, making the data unreliable.
How can I avoid biased imaging during dispersion testing?
Randomizing your field-of-view selection ensures that you are sampling the entire specimen rather than focusing on just the best-looking areas. This helps provide a more representative and accurate result.
What should I do if my dispersion test results are inconsistent across different labs?
Ensure that the same preparation methods, magnifications, and optical settings are used consistently. Also, align your test methods with ISO/ASTM standards to ensure consistency and comparability.
Why is it important to cross-check dispersion grade with images?
Dispersion grade alone doesn’t reveal underlying issues like agglomerates or poor distribution. By cross-checking the grade with images and distribution charts, you get a complete understanding of the material's quality.


