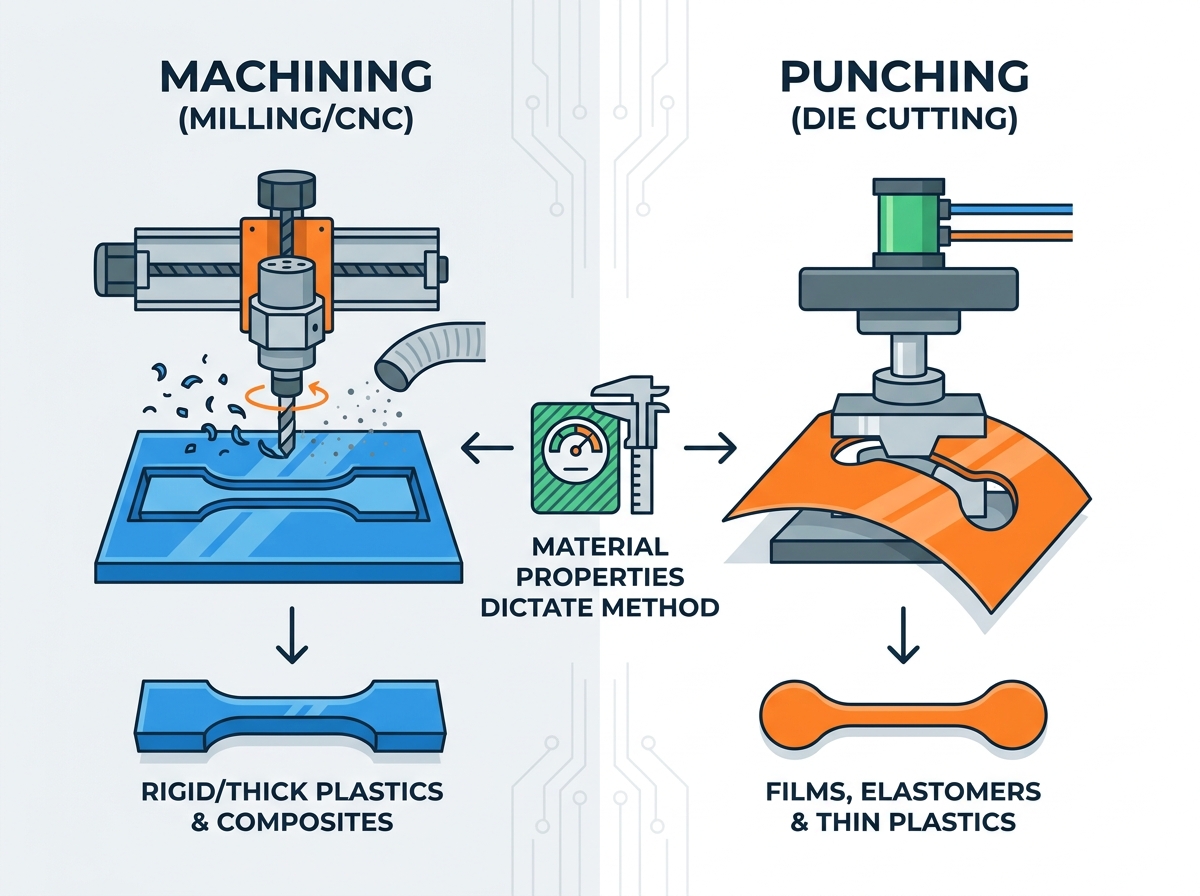
Precision in polymer testing begins long before a sample reaches the grips. Analytical accuracy depends entirely on the physical integrity of your prepared sample. Lab managers and quality engineers face a constant, high-stakes dilemma. They must balance demanding high-throughput daily requirements against the strict edge-finish tolerances required for reliable tensile testing. You simply cannot compromise on sample quality if you expect trustworthy data.
We operate under one fundamental baseline assumption. Regardless of the preparation method chosen, any localized stress concentrators will invariably lead to premature failure and invalid data. Micro-cracks, heat deformation, or jagged edges artificially weaken the polymer. We will explore the vital differences between machining and punching methods. You will discover how specific material properties dictate your best preparation technique. Ultimately, understanding these mechanics ensures your lab produces pristine samples, protecting your bottom line and maintaining strict compliance.
Key Takeaways
Material properties dictate the method: Punching is ideal for elastomers, films, and thin semi-rigid plastics; machining is mandatory for thick, rigid, or fiber-reinforced polymers.
Edge integrity is non-negotiable: Poorly maintained punching dies or incorrect machining feed rates create edge defects that artificially lower measured tensile strength and elongation.
Automation reduces variance: Upgrading from manual tools to pneumatic or CNC-driven preparation significantly reduces operator-induced inconsistencies.
Total Cost of Ownership (TCO) differs: Machining requires higher upfront CapEx and ongoing cutting-tool replacement, whereas punching requires die re-sharpening and alignment verification.
The Cost of Poor Specimen Preparation in Polymer Testing
Every experienced lab manager knows test data only reflects the weakest link in the specimen. The "Edge Effect" problem occurs when dull cutting tools create invisible micro-notches along the sample border. These microscopic notches act as intense stress concentrators during active testing. Instead of experiencing true material yielding and elongation, the polymer suffers a premature, brittle failure. The data curve breaks off long before reaching its actual potential.
When you place a flawed sample into your universal testing machine, the sensor cannot distinguish between fundamental material weakness and careless preparation damage. It simply records the exact moment the localized flaw gives way. Consequently, you end up measuring the physical errors of your preparation process rather than the ultimate tensile strength of your polymer.
Standard compliance presents another massive operational risk. Global regulatory bodies like ASTM D638 and ISO 527 strictly mandate pristine, parallel specimen edges. Auditors actively look for geometric deviations. Poorly prepared edges lead to immediate audit failures and officially rejected material lots.
This reality creates devastating false-negative rejections. You might scrap perfectly good material batches simply because your lab preparation failed. When material fails unnecessarily, you might wrongfully blame the resin supplier. This triggers exhaustive investigations, strains vendor relationships, and halts active production lines. This financial drain quietly destroys profit margins while operators chase non-existent material flaws.
Punching (Die Cutting): Strengths, Weaknesses, and Best Fit
Die cutting utilizes a customized, hardened steel die. The mechanism stamps out the specimen in one continuous, forceful motion. This single-stroke operation delivers high speed and repeatability when applied to the correct materials.
Ideal applications include flexible films, packaging foils, elastomers, rubbers, and thin, non-brittle plastics. As a general rule, we recommend die punching for polymer thicknesses under 3mm to 4mm, depending largely on the specific Shore hardness of the material.
The pneumatic advantage transforms modern lab efficiency. Manual toggle presses rely entirely on operator strength, inherently introducing variable force profiles. Upgrading to a pneumatic specimen punching device completely eliminates this human variance. Driven by compressed air, it ensures clean, uniform cuts every single time while dramatically reducing repetitive strain injuries and operator fatigue.
However, you must respect the primary limitations, often called the "Yield" risk. You must never punch thick or highly brittle plastics like cast acrylic, polycarbonate, or glass-reinforced nylon. The intense downward shear force causes severe edge-crushing. You will observe micro-fracturing or localized yielding, commonly known as crazing, along the entire punched edge.
Maintenance reality dictates strict daily oversight. You cannot ignore die inspection schedules if you want reliable data. Poor maintenance ruins expensive cutting tools quickly.
Always use recommended backing materials, such as specific nylon or polyurethane cutting mats.
Rotate the cutting mat regularly to avoid stamping into deep, pre-existing grooves.
Inspect the die blade under a magnifier weekly to catch microscopic nicks.
Machining (Milling/CNC): Strengths, Weaknesses, and Best Fit
Machining relies on high-speed rotary cutters to carve the specimen directly from a solid plaque. Modern labs typically deploy automated CNC routers or specialized template milling machines. Instead of shearing the polymer, the machine actively shaves away excess material.
Ideal applications broadly cover rigid plastics. Polycarbonate, ABS, and PEEK require this approach. Machining easily handles thick samples exceeding 4mm. Furthermore, we mandate machining for all glass or carbon fiber-reinforced composites, as punching would instantly shatter the reinforcing fibers.
Mitigating heat-affected zones (HAZ) represents your biggest operational challenge here. Excessive tool friction rapidly alters the polymer morphology. Localized melting or unintended annealing completely changes the mechanical properties before the sample even reaches the grips. Experienced technicians often prefer single-flute carbide end mills to maximize chip clearance and reduce frictional heat.
To prevent heat damage, strictly follow these practices:
Optimize your cutting feed rates specifically for the polymer type.
Adjust spindle speeds to balance smooth finishes against dangerous friction generation.
Implement active liquid or cold-air cooling when milling highly sensitive thermoplastics.
Primary limitations include a notably slower throughput per specimen compared to die punching. Machining generates significant plastic dust and swarf. You must install proper vacuum extraction systems to maintain lab safety. Operators also need higher technical training to manage tool offsets and safely secure the plaques.
Template versus CNC approaches offer a clear operational tradeoff. Manual template routing costs less upfront but carries higher dimensional variance due to human handling. Automated CNC milling provides ultimate precision and repeatability, though it demands substantial initial capital expenditure.
Core Evaluation Dimensions: How to Shortlist Your Dumbbell Specimen Maker
How do you choose between these distinct methodologies? Material rigidity and thickness serve as your primary filter. Ductile and thin materials demand a punch. Rigid, thick, or composite materials strictly require a machine.
Volume and throughput requirements quickly separate the available options. Imagine a quality control lab supporting a continuous extrusion line. They need instant feedback to prevent scrap. If you test 50 or more samples daily, a high-quality dumbbell specimen maker utilizing a pneumatic punch offers unmatched speed. You clear backlogs instantly. Machining suits low-to-medium volume environments or highly varied bespoke testing where precision outweighs raw speed.
Operator skill and ergonomics also heavily influence the decision. Machining requires a basic understanding of tool paths, spindle speeds, and feed rates. Pneumatic punching needs almost zero training to operate successfully. However, it does require robust safety guarding to protect operators' hands from the stamping zone.
Evaluate your footprint and infrastructure carefully. Machining demands robust dust extraction systems and sometimes specialized 3-phase power connections. Pneumatic punching simply needs a reliable, dry air compressor line nearby.
Budgeting involves comparing upfront capital expenditure against ongoing operational costs. Compare the initial machine price against consumable replacements. CNC router bits wear out and need frequent, routine replacement. Custom die fabrication costs more upfront, but professional re-sharpening remains relatively affordable over the lifespan of the tool.
Method Selection Matrix
Evaluation Criteria
Punching (Die Cutting)
Machining (Milling/CNC)
Best Material Profile
Films, elastomers, thin flexible plastics
Rigid plastics, composites, thick plaques
Throughput Speed
Very High (Seconds per sample)
Low to Medium (Minutes per sample)
Operator Skill Needed
Low
Medium to High
Primary Risk Factor
Edge-crushing or material crazing
Heat-affected zones (HAZ) from friction
Implementation Realities and Adoption Risks
Validation testing proves crucial during integration. Never switch preparation methods blindly. We strongly recommend running a parallel Gage R&R (Repeatability and Reproducibility) study. Compare the new preparation method directly against your historical test data. Ensure variances stay within acceptable standard deviations before fully retiring your old equipment.
Tool wear tracking must become a strict standard operating procedure. Establish clear rules dictating when to discard milling bits or send dies out for professional sharpening. Visual inspection alone fails constantly, as micro-nicks remain invisible to the naked eye. Instead, track exact cycle counts. Once a tool hits its predetermined maximum cycle threshold, replace it automatically.
Safety and compliance protocols address severe physical risks. CNC routers absolutely must have interlocked safety enclosures. The spindle should never engage while the access door remains open. Pneumatic presses must feature two-hand anti-tie-down controls. This design actively prevents operators from bypassing safety switches, essentially eliminating accidental crush injuries.
Environmental controls matter greatly during the preparation phase. Ambient temperature and humidity prior to and during cutting can affect the machining process. ASTM standards typically require conditioning specimens for at least 40 hours at 23°C and 50% relative humidity. If your machining process excessively heats the sample, this standard conditioning window might not fully relieve the induced internal stresses. Always maintain a climate-controlled preparation environment.
Conclusion
Neither preparation method stands universally superior. Your correct choice remains strictly bound by the material’s specific mechanical properties and its total thickness. Attempting to force one method onto incompatible polymers guarantees flawed test results.
Investing in high-quality preparation equipment directly correlates to the ultimate reliability of the data generated by your testing frame. Superior edge finishes lead to predictable, accurate tensile breaks. We highly recommend a proactive action step for your lab. Audit your current tensile testing failures today. Determine if subtle edge-defects represent the hidden root cause before you request vendor quotes for new preparation equipment.
FAQ
Q: Can I punch rigid plastics if they are very thin?
A: It depends heavily on the brittleness. Thin polystyrene may still micro-crack despite its thin profile. Always perform a pilot test and inspect the resulting edges under magnification before committing to a punch.
Q: How often should a cutting die be re-sharpened?
A: There is no universal timeline; it depends on material hardness and total cycle count. Establish a clear baseline by monitoring specimen edge quality and watching for statistical variations in your test data.
Q: Do ISO and ASTM standards specify the preparation method?
A: Standards dictate the final dimensional tolerances and require edges to be completely free of visible flaws. They generally allow either method provided the specimen meets strict physical criteria without altering material properties.
Q: Why is my punched specimen failing outside the gauge length?
A: Failures in the radius or grip section often indicate a nicked die blade, severe misalignment within the punch press, or uneven clamping pressure applied inside the universal testing machine.